Xiaomi Self-Install Smart Lock (Keypad Included) FAQ
Function Introduction
Q1: What are the selling points of the Xiaomi Self-Install Smart Lock (Keypad Included)?
A:
- Multiple unlock methods include fingerprint unlock, password unlock, key unlock, Bluetooth unlock, remote unlock, and voice unlock.
- Wi-Fi direct connection eliminates the need for a gateway and supports remote real-time monitoring of the lock status, as well as remote locking and unlocking.
- Supports Xiaomi Home and Matter ecosystem, compatible with Alexa and Google.
- The 2450 mAh lithium battery pack provides up to 6 months of battery life under standard usage conditions.
Note:
The 6-month battery life is based on 8 keypad lock/unlock operations per day in standard power consumption mode. Actual duration may vary depending on environmental factors. Please refer to actual usage conditions.
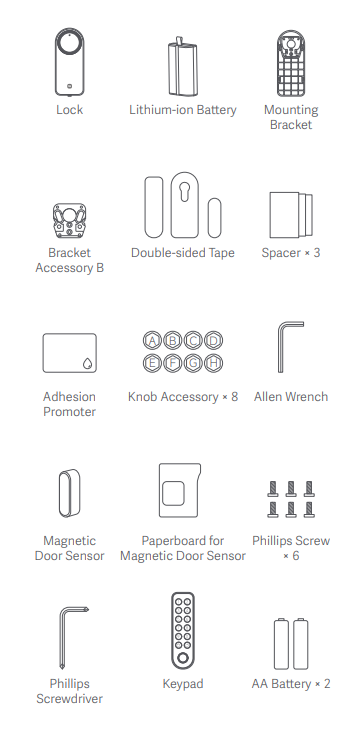
Q2: What is included in the standard package of the Xiaomi Self-Install Smart Lock (Keypad Included)?
A: The package includes the following items:
- Smart Lock Main Unit
- Lithium-ion Battery
- Mounting Bracket
- Bracket Accessory B
- Double-Sided Tape
- Spacer × 3
- Adhesion Promoter
- Knob Accessory × 8
- Allen Wrench
- Magnetic Door Sensor
- Paperboard for Magnetic Door Sensor
- Phillips Screw × 6
- Phillips Screwdriver
- Keypad
- AA Battery × 2
- Ejection Pin
- Wall Plug & Screw × 3
- Mounting Template Sticker
- Cleaning Cloth
- User Manual
- Warranty Notice
Q3: What is the appearance of the Xiaomi Self-Install Smart Lock (Keypad Included)?
A: The appearance of the Xiaomi Self-Install Smart Lock (Keypad Included) is introduced as follows:
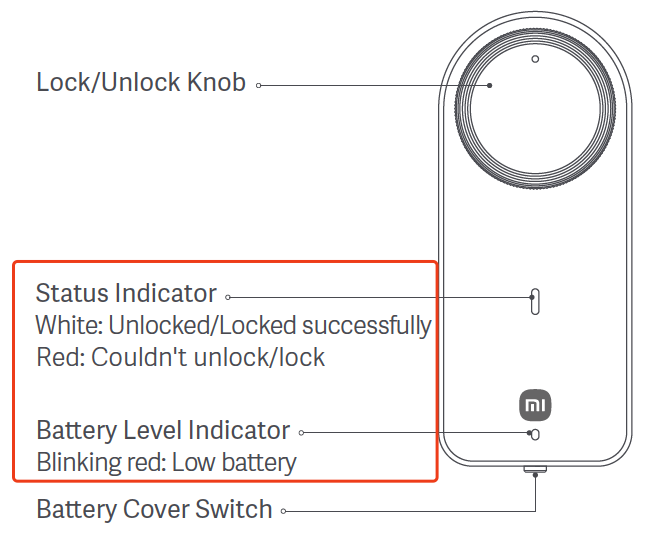
The lock features a well-designed and intuitive appearance. It includes a lock/unlock knob for manual operation and a status indicator that displays white when the lock or unlock operation is successful and red when it fails.
The battery level indicator blinks red to warn of a low battery. The battery cover and battery switch allow easy removal and installation of the lithium-ion battery, which blinks white while charging and turns off when fully charged.
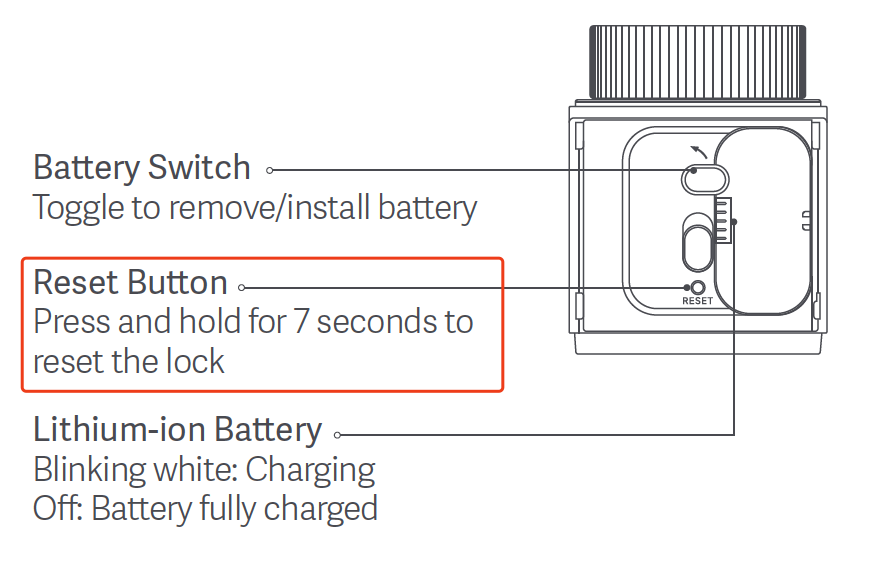
A reset button is provided, which can be pressed and held for 7 seconds to restore the lock to factory settings.
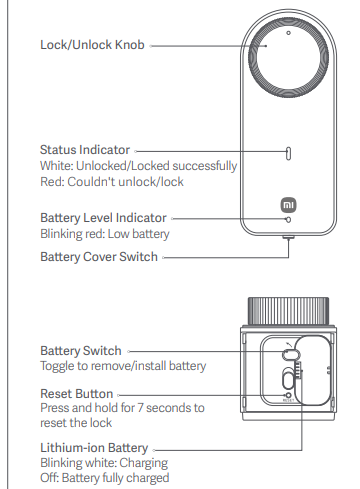
The keypad supports a status indicator at the upper, a password keypad with the numbers from 0 to 9, a lock button, an unlock/confirm button, a battery level indicator, and a fingerprint verification area.

Q4: What is the power supply method of the Xiaomi Self-Install Smart Lock (Keypad Included)?
A: The lock is powered by a 2450 mAh lithium battery. The battery pack is removable and can be charged separately. During charging, the white indicator on the battery pack flashes and turns off when fully charged.
The keypad is powered by two AA batteries.
Note:
The battery pack uses a Type-C charging port. Please use a 5 V 2 A adapter for charging. The charging time is approximately 3–5 hours.
Q5: What are the installation steps for the Xiaomi Self-Install Smart Lock (Keypad Included)?
A: Installing the keypad:
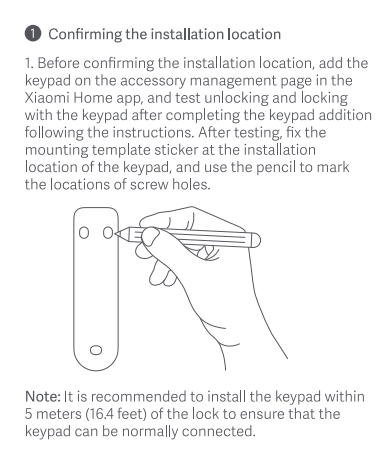
Confirming the installation location:
- Before confirming the installation location, add the keypad to the accessory management page in the Xiaomi Home app, and test unlocking and locking with the keypad after completing the keypad addition, following the instructions. After testing, fix the mounting template sticker at the installation location of the keypad, and use the pencil to mark the locations of screw holes.
Note:
It is recommended to install the keypad within 5 meters (16.4 feet) of the lock to ensure that the keypad can be normally connected.
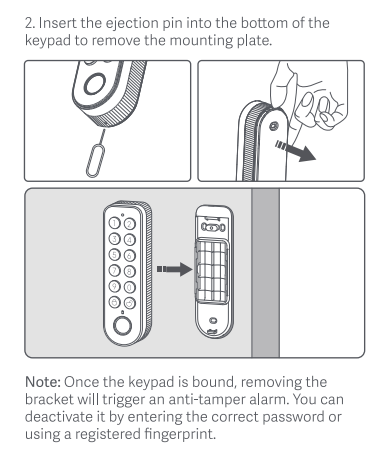
- Insert the ejection pin into the bottom of the keypad to remove the mounting plate.
Note:
Once the keypad is bound, removing the bracket will trigger an anti-tamper alarm. You can deactivate it by entering the correct password or using a registered fingerprint.
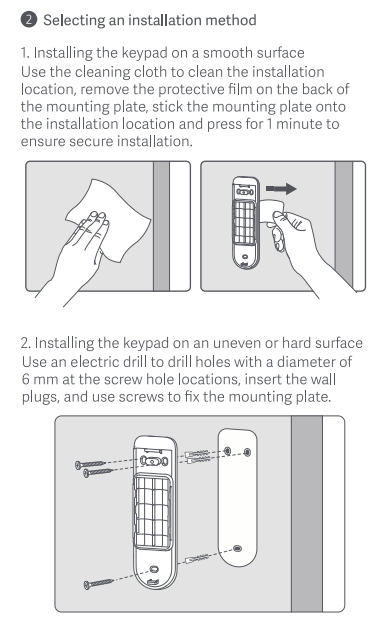
Selecting an installation method:
- Install the keypad on a smooth surface. Use the cleaning cloth to clean the installation location, remove the protective film on the back of the mounting plate, stick the mounting plate onto the installation location, and press for 1 minute to ensure secure installation.
- Install the keypad on an uneven or hard surface. Use an electric drill to drill holes with a diameter of 6 mm at the screw hole locations, insert the wall plugs, and use screws to fix the mounting plate.
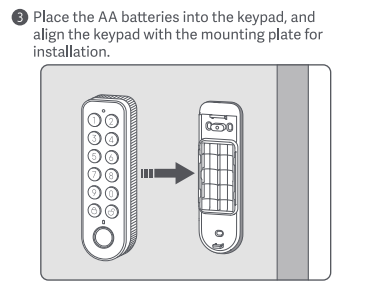
Place the AA batteries into the keypad, and align the keypad with the mounting plate for installation.
Installing the door lock:
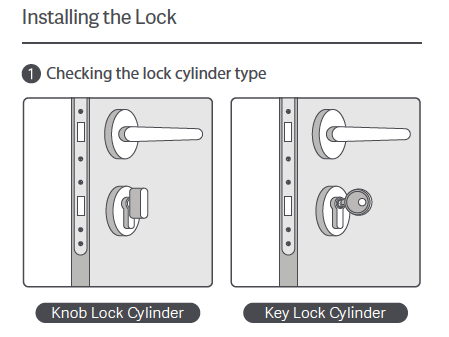
Checking the lock cylinder type:
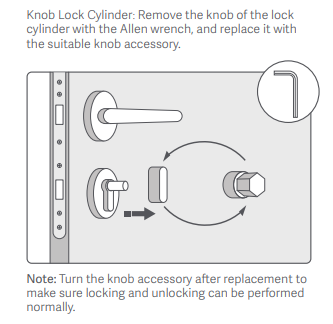
- Knob Lock Cylinder: Remove the knob of the lock cylinder with the Allen wrench, and replace it with a suitable knob accessory.
Note:
- Turn the knob accessory after replacement to make sure locking and unlocking can be performed normally.
Installing the bracket (protrusion height of lock cylinder ≥ 3 mm):
- Measure the protrusion height of the lock cylinder. If it is larger than or equal to 3 mm, use a spacer to install the bracket for an increased height.
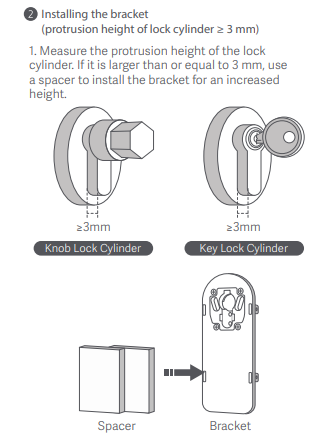
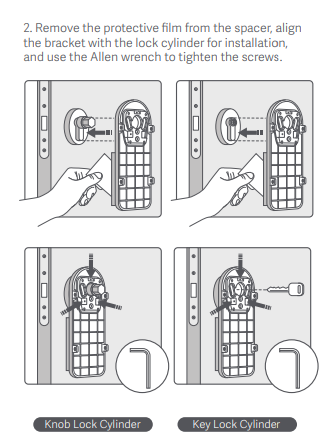
- Remove the protective film from the spacer, align the bracket with the lock cylinder for installation, and use the Allen wrench to tighten the screws.
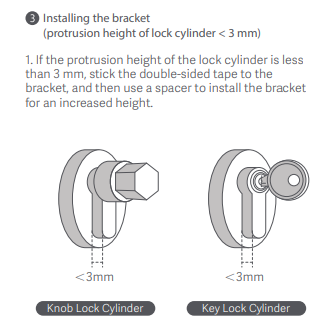
Installing the bracket (protrusion height of lock cylinder < 3 mm):
- If the protrusion height of the lock cylinder is less than 3 mm, stick the double-sided tape to the bracket, and then use a spacer to install the bracket for an increased height.
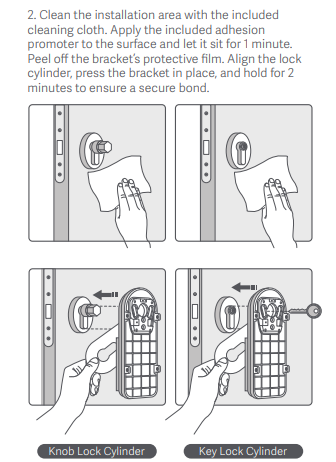
- Clean the installation area with the included cleaning cloth. Apply the included adhesion promoter to the surface and let it sit for 1 minute. Peel off the bracket's protective film. Align the lock cylinder, press the bracket in place, and hold for 2 minutes to ensure a secure bond.
Device Installation:
- Turn the lock knob, align the slot at the back of the lock with the key or knob, and install the lock on the bracket.
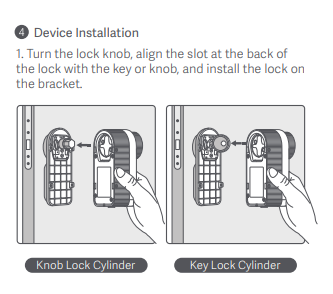
- Screw the four Phillips screws into the screw holes on both sides of the lock.

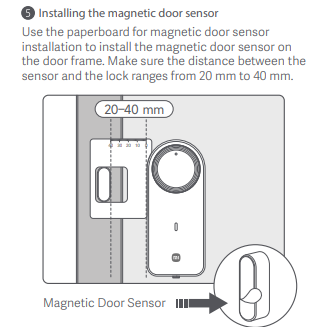
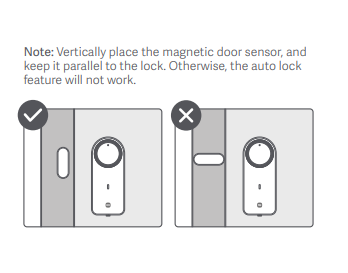
Installing the magnetic door sensor:
Use the cardboard for magnetic door sensor installation to install the magnetic door sensor on the door frame. Make sure the distance between the sensor and the lock ranges from 20 mm to 40 mm.
Note:
Vertically place the magnetic door sensor, and keep it parallel to the lock. Otherwise, the auto lock feature will not work.
Q6: How to reset the Xiaomi Self-Install Smart Lock (Keypad Included)?
A: Reset the keypad:
Press and hold the lock button and the unlock/confirm button for 7 seconds. If you have added a fingerprint or password on the Xiaomi Home App, you need to enter the correct fingerprint or password.
Reset the lock:
Press and hold the Reset button for 7 seconds. When you hear a beep, the factory reset is successful.
Q7: What are the status indicators of the Xiaomi Self-Install Smart Lock (Keypad Included), and what does each one mean?
A: The indicator on the keypad:
- The status indicator will show white for 1 second when an operation is successful and flashes red three times when the operation fails.
- When the battery level is below 10%, the battery level indicator flashes for 10 seconds.
- When entering Anti-theft lock mode, the keypad indicator will flash quickly for 30 minutes. You can enter the correct fingerprint or password to disable Anti-theft lock. Automatically disable Anti-theft lock after 30 minutes without input.
The indicator on the lock:
- The lock operation indicator shows solid white for 1 second when an operation is successful and flashes red three times if the latch is stuck.
- The battery indicator flashes red when the battery level is below 10%.
- The lithium battery pack charging indicator flashes white while charging and turns off when fully charged.
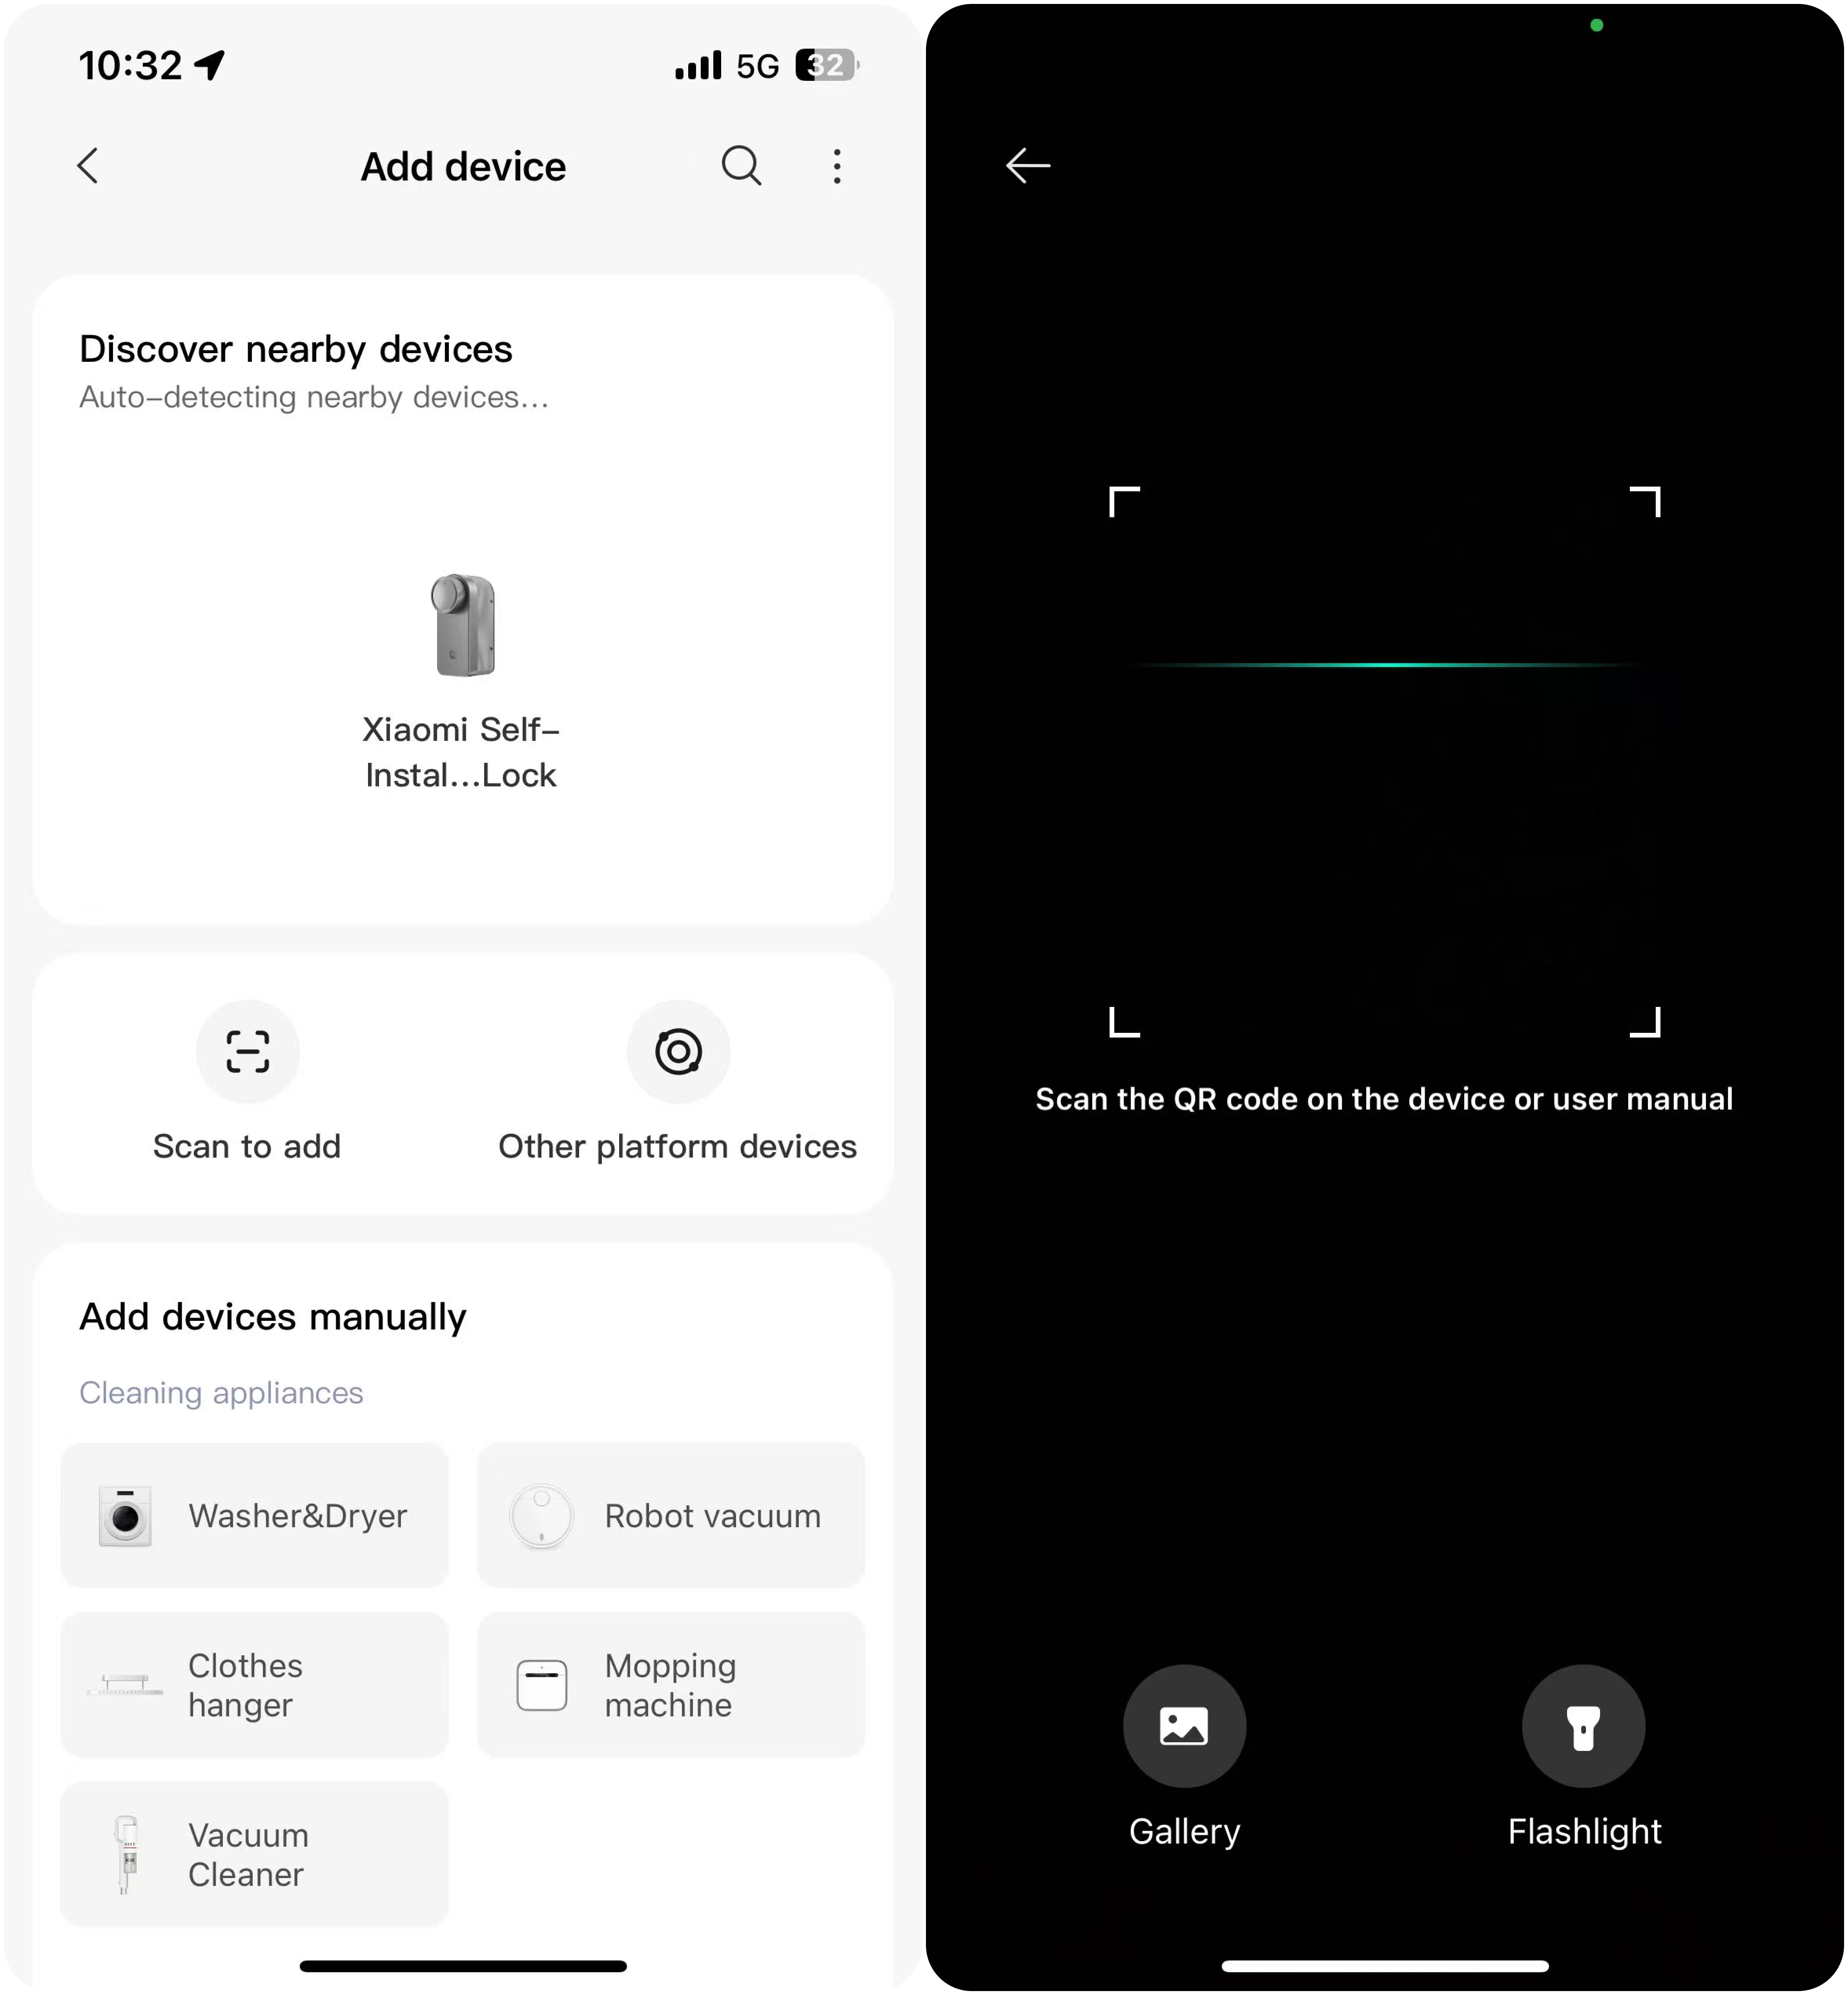
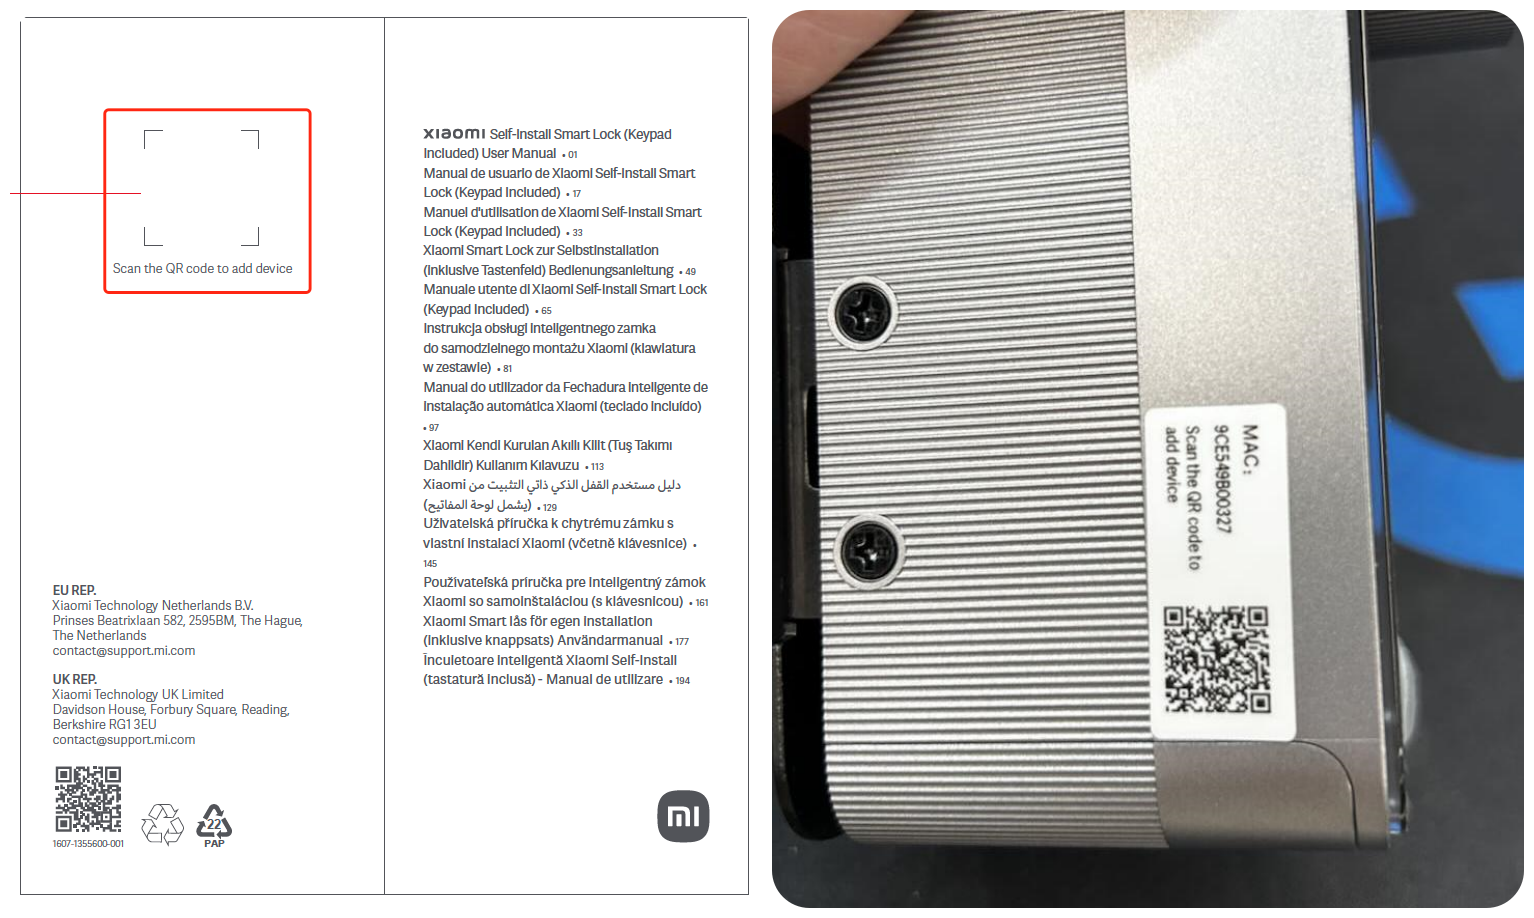
Q8: How to bind the Xiaomi Self-Install Smart Lock (Keypad Included)?
A: Bind the lock:
Insert the battery into the device, scan the QR code on the left side of the body or on the back of the manual to download and install the Xiaomi Home App. Open the App, tap the [+] icon, then either scan for nearby devices and tap [Add], or scan the QR code and follow the instructions to add the device.
Bind the keypad:
- After binding the lock, enter the device card.
- Tap [Keypad management] >> [Add].
- Follow the instructions to add the keyboard. When adding a keyboard, you will be instructed to press and hold the keyboard's lock button for 7 seconds. The status indicator will flash for 1 minute, and the app will prompt the keyboard to enter the pairing code to enter the keyboard pairing process.
Q9: What to do if the fingerprint of the Xiaomi Self-Install Smart Lock (Keypad Included) does not work properly?
A: The fingerprint function of the Xiaomi Self-Install Smart Lock (Keypad Included) supports users aged 7 to 70, but recognition performance varies depending on fingerprint development and wear. If a fingerprint is still difficult to use even when intact, it is recommended to re-enroll with a new fingerprint. During enrollment, try to maximize the coverage area, and when unlocking, use the same area that was recorded.
Q10: What is the material of the Xiaomi Self-Install Smart Lock (Keypad Included)?
A: The Xiaomi Self-Install Smart Lock (Keypad Included) is made of V0-grade fire-resistant ABS and PC materials, ensuring safety and fire protection.
Q11: How to remove the battery of the Xiaomi Self-Install Smart Lock (Keypad Included)?
A: At the bottom of the Xiaomi Self-Install Smart Lock (Keypad Included), there is a battery cover. Slide the battery cover switch to open it. Inside the cover is an orange tab switch; slide this switch to remove the battery. When installing the battery, also slide the orange tab to insert it. Once the battery is fully inserted, the lock will beep to indicate it is powered on successfully.
Q12: How to determine if the Xiaomi Self-Install Smart Lock (Keypad Included) is compatible?
A: The Xiaomi Self-Install Smart Lock (Keypad Included) is compatible with most European door locks. Before purchasing, please confirm whether your lock cylinder is compatible.
Here are the installation requirements of the Xiaomi Self-Install Smart Lock (Keypad Included) as follows:
- Support Euro cruciform lock.
- Support Euro profile lock cylinder.
- Support Scandinavian profile lock cylinder.
- Support UK oval lock cylinder.
- Support Euro thumbturn lock cylinder.
- Support UK mortise sash lock.
- Not support Swiss lock cylinder.
- Not support Assa 2000.
Note:
Key installation:
In addition to the above size requirements, if the indoor lock uses a key, make sure that inserting keys on both the inside and outside can operate the lock normally. If the anti-theft lock cylinder cannot be unlocked from the outside when the key is inserted inside, it is incompatible, and it is recommended to replace the lock cylinder.
Knob installation:
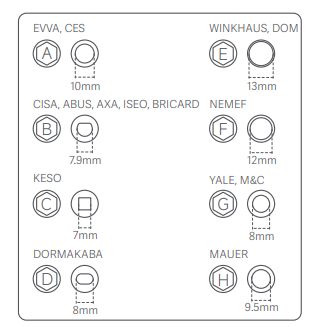
In addition to the above size requirements, if the indoor lock uses a knob, ensure the knob can be removed and that it can work with at least one of the 8 knob accessories provided in the kit. If the knob cannot be removed or none of the accessories fit, it is recommended to replace the lock cylinder.
Q13: Why is the automatic locking function not working on the Xiaomi Self-Install Smart Lock (Keypad Included)?
A: The automatic locking function on the Xiaomi Self-Install Smart Lock (Keypad Included) requires a magnetic door sensor. When installing the magnetic door sensor, make sure the distance between the sensor and the lock is within 40 mm (maximum 55 mm). If the distance is too far, the lock may not accurately detect the door status. It is recommended to use the timed auto-lock feature in the Xiaomi Home App, which enforces automatic locking after a set countdown once the door is opened.
Note:
When calibrating the magnetic door sensor on the Xiaomi Self-Install Smart Lock (Keypad Included), follow the instructions in the Xiaomi Home App. If you remove the battery for charging and then reinstall it, the door status shown in the app is incorrect. You need to open and close the door once to restore the correct status.
Q14: Does the Xiaomi Self-Install Smart Lock (Keypad Included) support 5 GHz Wi-Fi networks?
A: The Xiaomi Self-Install Smart Lock (Keypad Included) does not support 5 GHz Wi-Fi networks and only supports 2.4 GHz Wi-Fi networks.
Q15: Will the Xiaomi Self-Install Smart Lock (Keypad Included) automatically lock if indoor/outdoor verification succeeds but the door is not opened?
A: When using the door sensor’s auto-lock function, if indoor/outdoor verification is successful but the door is not opened, the lock will not automatically re-lock. The door must be opened and closed once for auto-lock to activate. It is recommended to enable both the door sensor auto-lock and the forced auto-lock functions to prevent the lock from remaining unlocked if the door is not opened after unlocking.
Q16: How to use the Xiaomi Self-Install Smart Lock (Keypad Included) after installation?
A: After installation, the Xiaomi Self-Install Smart Lock (Keypad Included) must be calibrated to function properly. After binding it to the app, follow the app’s instructions to calibrate the lock. Please follow the instructions carefully to ensure the lock works correctly after calibration.
Q17: How can the Xiaomi Self-Install Smart Lock (Keypad Included) be unlocked if the battery is completely drained?
A: When the Xiaomi Self-Install Smart Lock (Keypad Included) battery drops below 10%, the lock will beep six times, the low battery indicator will flash for 10 seconds, and the app will push a low battery notification. If you plan to travel or be away from home for several months, it is recommended to either fully charge the lithium battery in advance or carry the mechanical key to avoid being unable to unlock the door due to a completely drained battery.
Q18: What to do if the Xiaomi Self-Install Smart Lock (Keypad Included) malfunctions and the latch is stuck, preventing the door from opening?
A: If the Xiaomi Self-Install Smart Lock (Keypad Included) malfunctions and the latch is stuck, a notification will be sent to the app. The app’s emergency unlock function can be used, and the lock will attempt to unlock by rotating forward and backward. After the emergency unlock, the lock will remain in an abnormal state, and the app will prompt that the lock needs to be recalibrated before it can be used normally.
Q19: Can the Xiaomi Self-Install Smart Lock (Keypad Included) function normally if the phone has poor network connectivity or service is suspended due to unpaid bills?
A: The Xiaomi Self-Install Smart Lock (Keypad Included) uses Bluetooth for near-field connection and Wi-Fi for remote access. If the phone has poor network connectivity or service is suspended, ensure that Bluetooth is enabled on the phone, as the lock can still be operated normally via Bluetooth.
Q20: What to do if the Xiaomi Self-Install Smart Lock (Keypad Included) is difficult to turn manually after installation?
A: Please ensure that the knob accessories and bracket are installed correctly and not misaligned, which could increase friction. After initial installation, manually rotate the knob to confirm it moves smoothly. If the knob is still difficult to turn despite correct installation, use the one-touch lock/unlock button on the lock knob to operate it.
Q21: What precautions should be taken when using the Xiaomi Self-Install Smart Lock (Keypad Included)?
A:
- Before purchasing, make sure the lock is compatible with your door.
- The lithium battery lasts up to 6 months based on standard use of 8 lock/unlock cycles per day at 25 °C. Actual battery life may vary depending on usage conditions, and performance will decrease in low-temperature environments. Please refer to actual usage for battery life.
- To remotely view lock logs and receive alerts such as abnormal activity, phone notifications, and low battery reminders, ensure the lock is connected to Wi-Fi or the Bluetooth on the phone.
- Fingerprint recognition is suitable for people aged 7 to 70. Some users, such as the elderly or children, may experience low recognition rates due to underdeveloped or worn fingerprints; this is a common fingerprint recognition limitation.
- Fingerprint recognition accuracy is 99.3%. At room temperature (around 26 °C), testing with 1000 fingers, 20 scans per finger, totaling 20,000 true matches, showed a false rejection rate of 0.7%.
- Auto-lock requires a door sensor. Without a door sensor, only timed auto-lock can be used.
- Voice unlock requires a third-party smart speaker that supports Matter. For the best experience, it is recommended to bind the lock to the Xiaomi Home App.
- The keypad is IP65 water-resistant, but the lock itself is not waterproof. Use in dry environments only.
- When mounting adhesive products, press for approximately 60 seconds to ensure proper adhesion.
- After adhesive installation, do not forcibly remove the product to avoid damage to the device or wall surface. If removal is necessary, use a hair dryer to soften the adhesive before carefully peeling it off.
- The operating temperature range is -10 °C to 55 °C. Exceeding this range may damage the device.
- The operating humidity range is 0% RH to 93% RH. Avoid high-humidity environments.
- This product is not a toy and contains small parts. Keep out of reach of children to prevent choking or other hazards.
- When the keypad battery is depleted, replace it with alkaline AA batteries. Using incorrect battery types may cause an explosion risk.
- If the battery compartment is not securely closed, stop using the product and keep it away from children.
- Do not throw batteries into fire or high-temperature ovens, or mechanically crush or cut them, as this may cause an explosion.
- Ensure the product is installed within Wi-Fi coverage and, if possible, in a location with a strong signal.
- Avoid placing the lock near microwaves or other devices that may interfere with Wi-Fi signals.
- If the lock battery is depleted, remove the lithium battery and charge it using a 5 V 2 A adapter. Do not use a power bank for simultaneous charging and use, as this may damage the lock or cause accidents.
Q22: Why can’t the Xiaomi Self-Install Smart Lock (Keypad Included) connect to the Xiaomi Home App?
A:
- Ensure the lock is connected to a Wi-Fi network. If using Bluetooth, make sure the phone is within 10 meters of the lock.
- Check that the Xiaomi Home App is updated to the latest version.
- If the lock still cannot connect, remove the device from the app and set it up again.
Q23: Why does adding the Xiaomi Self-Install Smart Lock (Keypad Included) to the app fail?
A: Please check whether the Wi-Fi or Bluetooth connection is interrupted, the battery level is low, the router settings are conflicting, or the app version is outdated.
Please refer to the following methods to add the Xiaomi Self-Install Smart Lock (Keypad Included) to the Xiaomi Home App:
- Ensure the lock is connected to a Wi-Fi network. If using Bluetooth, make sure the phone is within 10 meters of the lock.
- For first-time use, it is recommended to remove the lithium battery pack, fully charge it, and then use the lock.
- Check whether the router’s 2.4 GHz band is enabled.
- Update the Xiaomi Home App to the latest version.
Q24: Can the same Xiaomi Self-Install Smart Lock (Keypad Included) be connected to multiple phones?
A: No, this lock uses a one-to-one connection method, meaning each Xiaomi Self-Install Smart Lock (Keypad Included) can only be connected to a single phone.
Q25: Can the Xiaomi Self-Install Smart Lock (Keypad Included) be simultaneously bound or connected to multiple Xiaomi accounts?
A: No, it can only be bound or connected to a single Xiaomi account at a time.
Q26: Under what circumstances will the Xiaomi Self-Install Smart Lock (Keypad Included) send alert notifications?
A: The Xiaomi Self-Install Smart Lock (Keypad Included) will send alert notifications under the following circumstances:
- Multiple failed attempts using the fingerprint or password.
- Unlock attempt using a duress (coercion) fingerprint.
- Low battery on the lock or keypad.
- Keypad tampering or forced opening.
- Door left open.
You need to enable notification permissions for the Xiaomi Home App in your phone’s system settings, and also turn on abnormal notifications in the lock’s plugin page under [Settings] >> [Notification Management].
Q27: Why does the lock button not respond, or why can’t the Xiaomi Self-Install Smart Lock (Keypad Included) lock properly?
A: In the Xiaomi Home App, the lock button can be disabled. By default, this setting is off. If the lock button is disabled, it will not function, and you need to turn off this feature in the Xiaomi Home App.
Q28: Why does the Xiaomi Self-Install Smart Lock (Keypad Included) operate without sound and only flash lights?
A: The sound can be set in the Xiaomi Home App and is turned on by default. If turned off, the local operation sound on the lock will be muted.
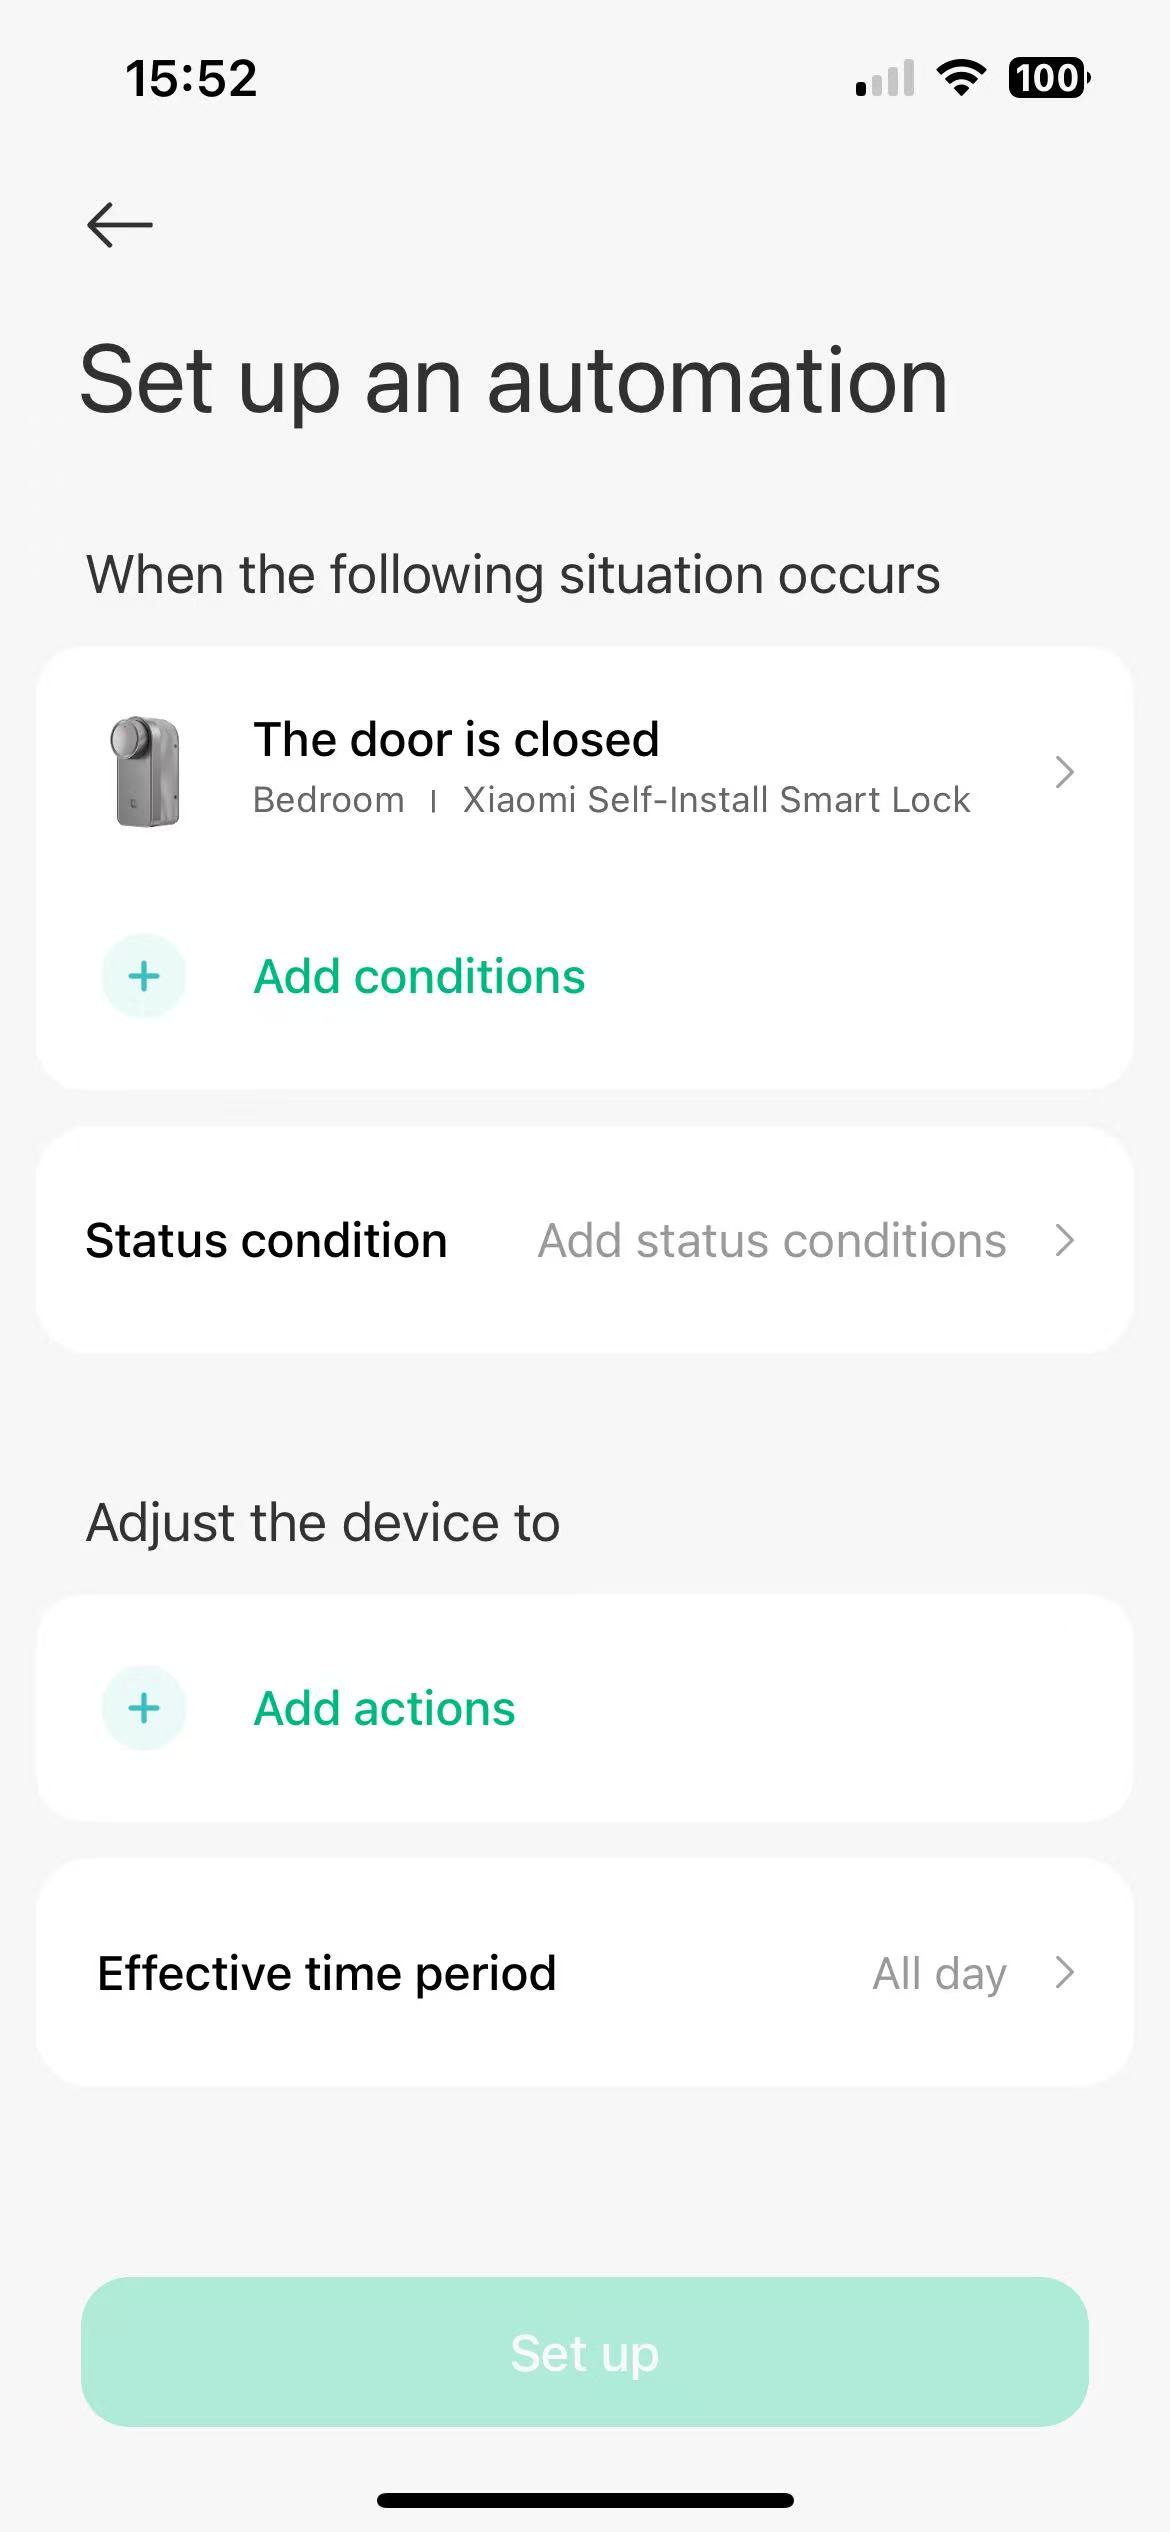
Q29: How to create a smart scene for the Xiaomi Self-Install Smart Lock (Keypad Included)?
A: You can create a smart scene in the Xiaomi Home App by setting trigger conditions for the lock and adding actions for other smart devices, completing the setup.
Q30: Which mobile operating systems are supported for connecting the Xiaomi Self-Install Smart Lock (Keypad Included) to the Xiaomi Home App?
A: Android 8.0 or iOS 12 and above are supported; lower versions may not function properly.
Q31: Does the Xiaomi Self-Install Smart Lock (Keypad Included) support HomeKit integration?
A: The Xiaomi Self-Install Smart Lock (Keypad Included) supports HomeKit integration via Matter, but does not support unlocking with HomeKey cards.
Q32: Under what circumstances can the Xiaomi Self-Install Smart Lock (Keypad Included) enter an abnormal state, and how can it be restored?
A:
- Latch stuck or jammed – use emergency unlock
- Remove the battery to charge and then power the lock back on
- Calibration not performed according to the operation instructions
Note:
If the lock enters an abnormal state due to using emergency unlock or incorrect calibration, follow the app’s calibration instructions to recalibrate. If the battery was removed for charging and then reinstalled, use the lock’s one-touch lock/unlock button to restore normal operation.
Q33: If all recognition methods fail and the Xiaomi Self-Install Smart Lock (Keypad Included) cannot be unlocked, how to unlock it?
A:
- Use the Xiaomi Home App to perform an emergency unlock. The emergency unlock first tries to unlock in one direction. After one attempt, try to open the lock. If it still cannot be unlocked, perform emergency unlock again; it will then try in the opposite direction, after which you can attempt to open the lock again.
- If the emergency unlock still fails, use the mechanical key to unlock.
Note:
If the lock enters an abnormal state due to emergency unlock or incorrect calibration, follow the app’s calibration instructions to recalibrate. If the battery was removed for charging and reinstalled, use the lock’s one-touch lock/unlock button to restore normal operation.
Q34: What is the material of the keypad of the Xiaomi Self-Install Smart Lock (Keypad Included)?
A: The keypad is designed with V0-grade fireproof materials such as ABS, PC, and silicone. It also has an IP65 waterproof rating and can be used outdoors.
Note:
The door lock is designed for indoor installation and is not waterproof. Do not install it outdoors.
Q35: How to enable and disable the keyboard anti-theft function on the Xiaomi Self-Install Smart Lock (Keypad Included)?
A: After the keyboard is bound to the app, the anti-theft feature is enabled by default and can be disabled in the app.
The baseplate has a Hall effect magnet. Removing the keyboard from the baseplate triggers the anti-theft alarm. Therefore, if you linked the keyboard to the app during installation, the anti-theft feature will be triggered. Simply enter your fingerprint or password to disable it, or relink the keyboard after installation.
Note:
After the keyboard triggers the anti-theft feature, reinstalling the baseplate or removing the battery and re-powering it on will not disable it. You must enter your fingerprint and password correctly, or wait 30 minutes, to disable the anti-theft feature.
Q36: What kind of battery can be replaced if the keypad of the Xiaomi Self-Install Smart Lock (Keypad Included) runs out of power?
A:
- The keypad is powered by two AA batteries. If they run out of power, you can replace them with similar AA alkaline dry batteries. It is recommended that both batteries be replaced at the same time; do not mix them.
- When choosing batteries, please use high-quality, brand-name alkaline batteries. Otherwise, battery leakage may occur, causing door lock malfunctions that are not worth the cost.
- Check the battery level regularly. You will receive a notification if the battery is low.
Note:
We recommend using disposable alkaline dry batteries instead of rechargeable batteries. Using reusable rechargeable batteries may result in an inaccurate battery display.
Q37: What is the battery endurance of the keypad of the Xiaomi Self-Install Smart Lock (Keypad Included)?
A: The keyboard can be locked and unlocked 10 times a day, and its normal battery life can reach more than 10 months. The actual battery life will vary depending on the battery used (different brands have different capacities) and the frequency of use.
Q38: What is the feature of the fingerprint recognition on the Xiaomi Self-Install Smart Lock (Keypad Included)?
A: The keyboard utilizes a multi-dimensional semiconductor fingerprint recognition module. By combining fingerprint, skin, and conductivity, the algorithm achieves a more accurate and secure recognition rate of 99.3%.
Note:
The 99.3% fingerprint recognition rate is based on testing at room temperature (approximately 26 °C) using a proprietary algorithm and database software. The software was tested using 1,000 fingerprints, capturing each finger 20 times, for a total of 20,000 true matches and a false rejection rate of 0.3%.
Q39: How to replace the keypad battery of the Xiaomi Self-Install Smart Lock (Keypad Included)?
A: There's a small security hole on the bottom of the keyboard. To remove it, simply insert the included ejection pin or a sharp object like a paper clip into the hole. Remove the keyboard, replace the battery, and then reinstall it.
Note:
The keyboard bracket has a waterproof ring around the battery cover. Ensure it's aligned during installation to ensure the keyboard is waterproof.
Q40: Why is there no response when tapping the fingerprint recognition area or the password on the Xiaomi Self-Install Smart Lock (Keypad Included)?
A:
- Please check if the keypad has enough power.
- Check whether the keyboard is locked by entering incorrect fingerprints or passwords multiple times.
- The App can set the keyboard to be disabled, which is closed by default. If it is turned on, keyboard operations will not respond.
Note:
The trial and error alarm function is turned on by default in the App. The default number of times is 10, and the App can set the number of times. After the number of trial and error times is reached, the keyboard will be locked for 90 seconds. During the lock period, no key presses or fingerprints will respond.
Does it help?
Yes
No