What are the steps of mounting the Xiaomi Smart Camera C300 Dual on a wall?
To mount the camera on a wall, please refer to the following steps:
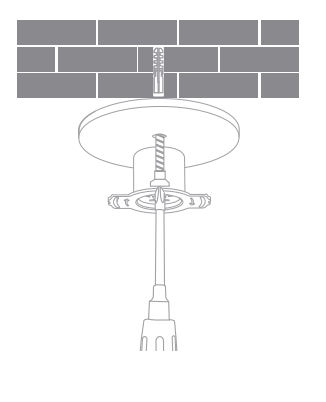
1. Paste the mounting sticker where the camera needs to be installed, and drill two holes in the wall with a drilling tool according to the locating holes on the sticker. The hole is approximately 6mm in diameter and approximately 30mm in depth;
2. Insert the two wall plugs into the drilled holes;

3. Position the wall mount with the side marked with an arrow facing outward. Align the wall mount holes with the holes in the wall. Pass the screws through the wall mount holes, and tighten them into the wall plugs on the wall using a Phillips screwdriver;
4. Align the grooves at the bottom of the camera with the raised part on the wall mount and snap them together. Hold the sides of the wall mount marked with “≡” and rotate the camera clockwise until you hear a click, indicating the camera is securely locked in place;
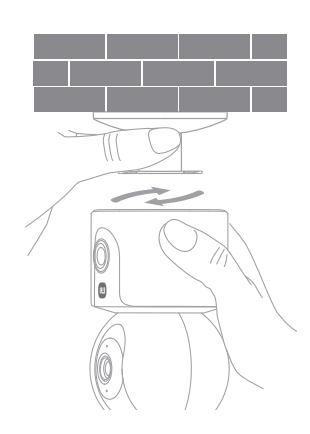
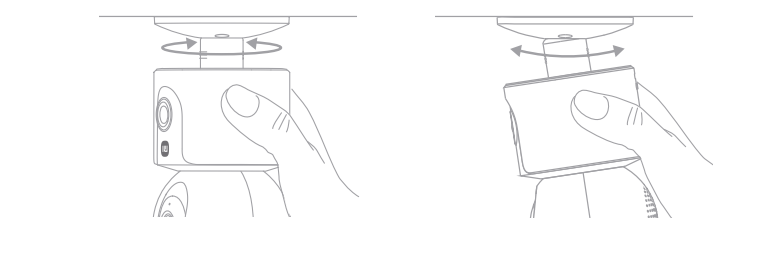
5. Adjust the camera to a desired angle by using the adjusting pivot on the wall mount. Hold and rotate the camera body to adjust the horizontal direction of the fixed camera lens, and along the direction marked with “≡” on the wall mount, adjust the tile angle of the fixed camera lens.
Note:
1. The wall must be able to support at least three times the total weight of the camera;
2. The camera must be securely fixed to a ceiling or wall in accordance with the installation instructions to prevent potential damages;
3. After the downward installation, you need to rotate the image 180° in the camera settings in the Mi Home/Xiaomi Home APP.
1. Paste the mounting sticker where the camera needs to be installed, and drill two holes in the wall with a drilling tool according to the locating holes on the sticker. The hole is approximately 6mm in diameter and approximately 30mm in depth;
2. Insert the two wall plugs into the drilled holes;
3. Position the wall mount with the side marked with an arrow facing outward. Align the wall mount holes with the holes in the wall. Pass the screws through the wall mount holes, and tighten them into the wall plugs on the wall using a Phillips screwdriver;
4. Align the grooves at the bottom of the camera with the raised part on the wall mount and snap them together. Hold the sides of the wall mount marked with “≡” and rotate the camera clockwise until you hear a click, indicating the camera is securely locked in place;
5. Adjust the camera to a desired angle by using the adjusting pivot on the wall mount. Hold and rotate the camera body to adjust the horizontal direction of the fixed camera lens, and along the direction marked with “≡” on the wall mount, adjust the tile angle of the fixed camera lens.
Note:
1. The wall must be able to support at least three times the total weight of the camera;
2. The camera must be securely fixed to a ceiling or wall in accordance with the installation instructions to prevent potential damages;
3. After the downward installation, you need to rotate the image 180° in the camera settings in the Mi Home/Xiaomi Home APP.
Does it help?
Yes
No